Help / Software Basics / Biofeedback Data
Biofeedback-Data
This guide walks you through connecting the biofeedback sensor to your laptop, activating it in the software, and exporting your data.
Guide
1. Connect the sensor to the laptop
- Charge the sensor: Plug in for about 2–3 hours. Green light = charging, no light = fully charged.
- Switch on the sensor: Press the small power button. The blue light will blink – the sensor is ready.
- Activate Bluetooth on the laptop: Open Windows search → type “Bluetooth” → open settings → switch on Bluetooth.
- Pair the device: Click Add Device → Bluetooth. Select the sensor. Status should show paired and connected. Pairing remains stored and does not need to be repeated each time.

2. Start the sensor in the software
- Open software: Launch the VR Coach smart system Software
- Activate biofeedback: Go to My Account and tick Biofeedback connection.
- Select sensor type: Choose Evo TPS (older version) or Evo TPS-BLA (since 2023).

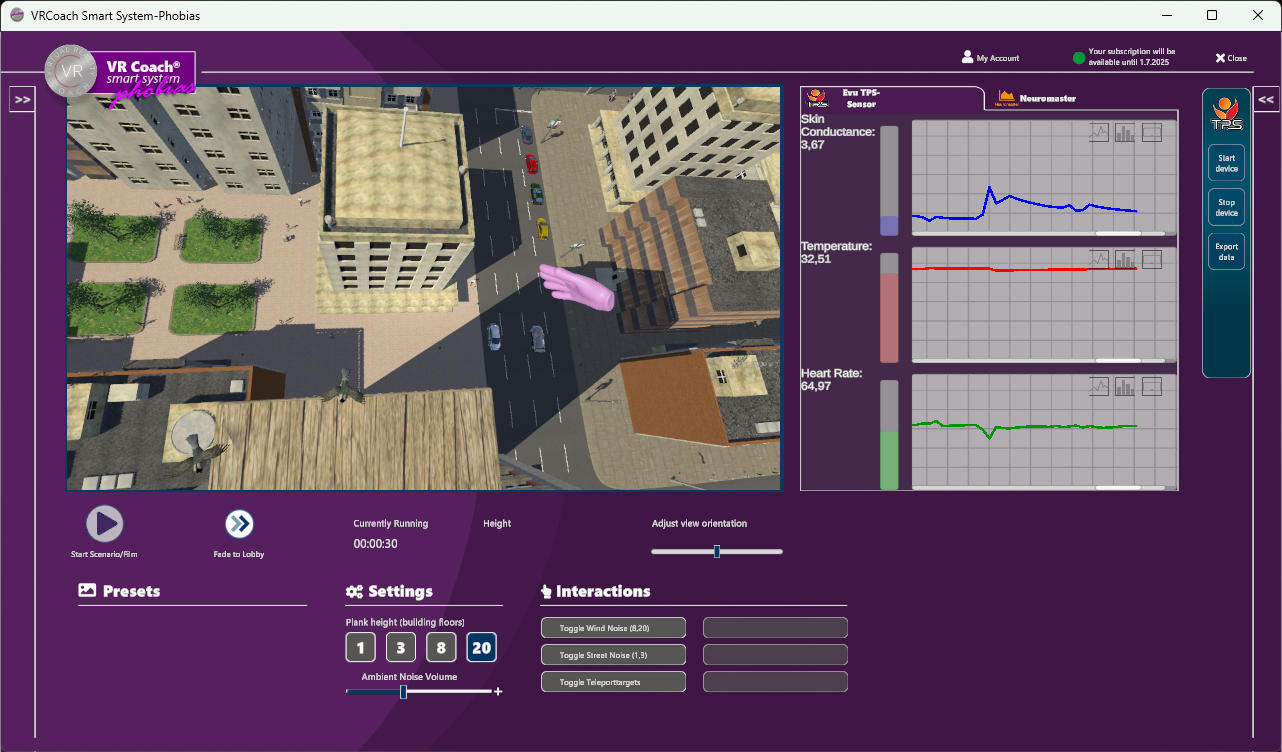
- Open Biofeedback Panel: In the scenario window, click the panel and select Start device. After a few seconds, you will see “Successfully connected with TPS.”
- View live data: Skin conductance, finger temperature, and heart rate appear. To add notes: double-click in the diagram at the desired point and enter your comment (e.g., “8th floor,” “wind noise,” “abdominal breathing”).
3. Export data
- Stop or export measurement: Click Stop device or directly Export Data.
Important: Export works only if Microsoft Excel is installed.
- Raw data in Excel: Time, skin conductance, temperature, heart rate, scenario, and notes are exported.
- Create diagram: Select the column (e.g., skin conductance) → Insert → Chart. Notes can be added manually.
- Save data: Name the file clearly (e.g., Patient XY, session, date) to make future comparisons easier.

4. Biofeedback display in the VR headset
Start measurement: Begin the scenario as usual (e.g., height exposure). Data appears in the panel.
Activate VR display: Click the screen icon at the far right of the diagram. A bar (e.g., skin conductance) appears in the VR headset.
Adjust position: Use arrow keys (←/→) to move the bar left or right.
Change size: Press Plus (+) to enlarge, Minus (–) to shrink. Ensure readability without blocking the scene.
Deactivate display: Click the screen icon again to hide the bar.


Webinar-Link
In this short webinar, you can also watch the steps again as a video tutorial. (currently only available in german)