Help for Private Practices / Install and Connect Apps
Install and Connect Apps
Your first session in just a few steps: install the VR app on the headset, set up the client app on the tablet and connect both devices.
what you need
- A Pico or Meta headset with an account set up
- An Android tablet or smartphone running Android 9 or later with a 64-bit processor
- Both devices on the same Wi-Fi network
- The invitation link and the account details from VR Coach
1
Install the VR app on the headset
PICO
1 • Set up the headset
Create a Pico account and set up the headset according to Pico’s instructions.
2 • Open the invitation link
We will send you an invitation link to the app. Click on it.
3 • Install the app
The VR Coach for Private Practices app appears on the headset under “Not installed”. Install it from there.
META
1 • Set up the headset
Create a Meta account and a Meta Horizon account, install the Meta Horizon app on your smartphone or tablet and pair the headset with it.
2 • Accept the invitation
We will send you a release channel link. Open it and accept the invitation.
3 • Install the app
Open the Library on the headset and install the VR Coach app for private practices.
- App not visible? Restart the headset and check again.
2
Client app on the tablet
Download the client app from the Google Play Store. It only runs on Android devices with version 9 or later with a 64-bit processor.
3
Connect and Sign In
You can sign in via the client app or directly in the VR app. For trying things out, the controls in the headset are sufficient – for sessions with patients, we recommend the client app because the connection is more stable.
Via the client app (recommended)
1 • Start the client app
First open the client app on the tablet.
2 • Open the VR app on the headset
Both devices connect automatically at startup.
3 • Wait for the lobby
As soon as the lobby appears, the user icon in the client app becomes active. The first time, a tutorial on the controls starts.
4 • Sign in
Tap the user icon and sign in with your account details.
5 • Wait for the download
Wait until all scenarios have been downloaded – then the session can start.
- Important:
The client app must already be open while the VR app’s start screen is showing. No connection? Check that both devices are on the same Wi-Fi network and start again at step 1
Directly in the VR app
1 • Start the VR app
Open the app on the headset and wait for the lobby.
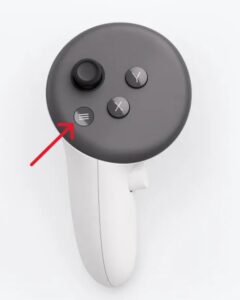
2 • Open the menu
Press the in-game menu button on the controller.

3 • Sign in
Enter your account details under “Settings”.
4 • Wait for the download
Once all scenarios have been downloaded, you can also start without the client app.
- Want to use the client app later after all?
Close the VR app completely, open the client app, then restart the VR app – connection and sign-in happen automatically.
During a session, you can open the menu with the scenario’s interaction options and settings at any time using the in-game menu button.
- Several headsets on the same Wi-Fi network
- If several headsets are on the same Wi-Fi network, the client app shows a selection list.
- Choose the headset by the name displayed in the headset.
- Without a custom name, a device is shown with its IP address and port number.
- In the VR app settings, you can give each device its own name – e.g. per room or per client.
Would you also like to use AI Scenes? To do so, also install the AI Only App. Go to the instructions
If you can’t find an answer here, we will be happy to help you by phone or in writing!