Hardware Setup
Preparing the laptop


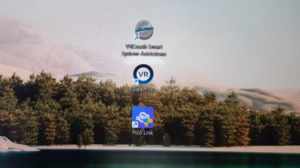
The laptop has been prepared by us so that the most important programs are already installed and centrally placed on the desktop:
- VR Coach App
- SteamVR
- Pico App
Please keep the laptop plugged in at all times and connect it to Wi-Fi. There may be an available Windows update in the meantime. Please proceed with this if necessary.
The laptop has a special USB A port that you will need later for the headset’s cable connection. The correct port is marked with a colored dot.
Preparing the headset


The most important preparation steps have already been taken by us. The following steps still need to be completed by you.
- Charging the headset
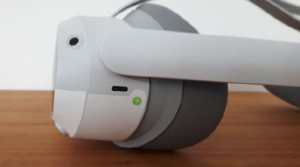
Use the charging cable included in the headset packaging to charge the headset, preferably by plugging it into a wall socket. The light on the side of the headset should at least be blue. Then the battery is about 50% charged. If it’s green, the battery is fully charged. - Turning on the headset
Press the power button on the right side of the headset for a few seconds until the Pico logo appears on the screen. - Setting the boundary
After turning on the headset, you will be asked whether you want to confirm the last “play area” or set a new one. Whenever the headset is used in a room for the first time, we recommend setting up a new area.
Using the button on the controller by your index finger, draw a boundary on the floor within which you can move freely with the headset. This area should be as large as possible to ensure a better experience later on. Use the same button on the controller to confirm the defined room boundary. Make sure that the automatic floor adjustment is accurate. The virtual grid should align perfectly with the physical ground. Otherwise, follow the steps in the headset for manual adjustment.
Connecting the headset with the laptop


In the last step, it’s now about connecting the headset to the laptop using the 5-meter streaming cable.
The laptop is already turned on and connected to the Wi-Fi. The headset is already turned on, and the play area has been set.
- Plug the cable into the left side of the headset and the other end into the laptop where the colored dot is located.
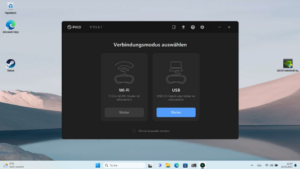
- Double-click the Pico app on the laptop to open it. Click “Next” on the right for the USB connection.
- Also confirm this connection in the headset.. Once you click “Next” for the USB connection, a prompt will appear asking you to also select this type of connection in the headset.
- Now put on the headset and take a controller in your hand. Using the index finger button at the bottom in the settings click on ” library“. Then click on the Pico Streaming Assistant. This is an app with the Pico logo. When the app opens, you will see your laptop displayed on the right under the USB connection.. Then click on the blue “connect“-Button. After a few seconds, the environment in the headset changes as SteamVR is automatically started. Now remove the headset and set it aside for a moment.
Starting the VR Coach Software
On your laptop, double-click to open the VR Coach app.. For example, Addiction, Phobia, or Depression (depending on what has been installed for you). The headset and controllers must be in active mode during this process so that they are recognized by the VR Coach app (move them slightly). Otherwise, the VR Coach app will restart automatically.
After a short loading time, the therapist view will appear on the laptop.. At the same time, the first scenario will appear in the headset. (the lobby). For changing the hand type or for all control options of the software, please refer to the user manual of the software.
4 steps to start
4 steps to start
These steps will be necessary for starting in the future:
- Turn on the laptop and connect to the Wi-Fi.
- Turn on the headset and set up the play area boundary.
- Connect the headset to the laptop using the streaming cable and the two Pico apps, one on the laptop and the other in the headset.
- Start the VR Coach app
After a few starts, these steps can typically be completed in less than five minutes. Provided that the headset has a sufficiently charged battery.
Alternatively, wirelessly

You can also use this headset wirelessly. For this, you need a sufficiently strong Wi-Fi network or a Wi-Fi router.
The headset and laptop must then be connected to the same Wi-Fi network.
There are only a few differences from the steps listed above.
Under “Prepare Headset,” there is then a fourth point. After point 3 (setting up the play area boundary), you need to click on the Wi-Fi icon in the headset, select a network, and connect the headset to it.
The first time, you will need to create a Pico account using your email address and name.
In the Pico apps on both the laptop and the headset, select Wi-Fi (instead of USB).
Turn on the controllers

With frequent use, the batteries in the controllers need to be replaced, by the way. A notification will be displayed on the desktop when the batteries are running low.
Still having issues?
If anything in this process doesn’t work, we are happy to help by phone or in writing.
If you don’t find answers here, we are happy to assist you by phone or email!